How to Build an Application Without a Backend in 2023
Easy guide for noobies


Photo by Ilya Pavlov on Unsplash
Are you eager to create your own applications but worried about the complexities of setting up a backend system? Fear not! It’s easier than ever to build an app without a backend. I’ll guide you through the process in simple, newbie-friendly terms so that anyone can understand and embark on their app-building journey
Why Go Backend-Free?
Before diving into the “how,” let’s discuss the “why.”
Why Backend?
A backend system is the server-side component of an app that handles data storage, user authentication, and more.

While important for complex applications, it can be daunting for beginners.
Going backend-free simplifies the development process and allows you to focus on the app’s front end (the user interface) and functionality.
Wait...What??

Okay, Let me explain...
So, How can I eliminate the backend?

With the emergence of powerful tools like Appwrite, eliminating the backend has become a reality. In this blog post, we will explore how you can effectively eliminate the backend using Appwrite.
What is Appwrite?
Appwrite is an open-source Backend as a Service (BaaS) platform that provides developers with a set of pre-built tools and infrastructure to simplify backend development. It offers a ready-to-use server infrastructure and a variety of SDKs that allow developers to handle common backend functionalities without the need for custom backend code.
Let's examine the lower-level aspects of the general system architecture of an application.

This is the general-purpose design of any modern app I have taken Nodejs as an example but it's applicable to all other backend frameworks like SpringBoot, Laravel, Go-Gin, etc
It can be overwhelming and complex to develop APIs, implement business logic, and compose queries for data retrieval.

With Appwrite,
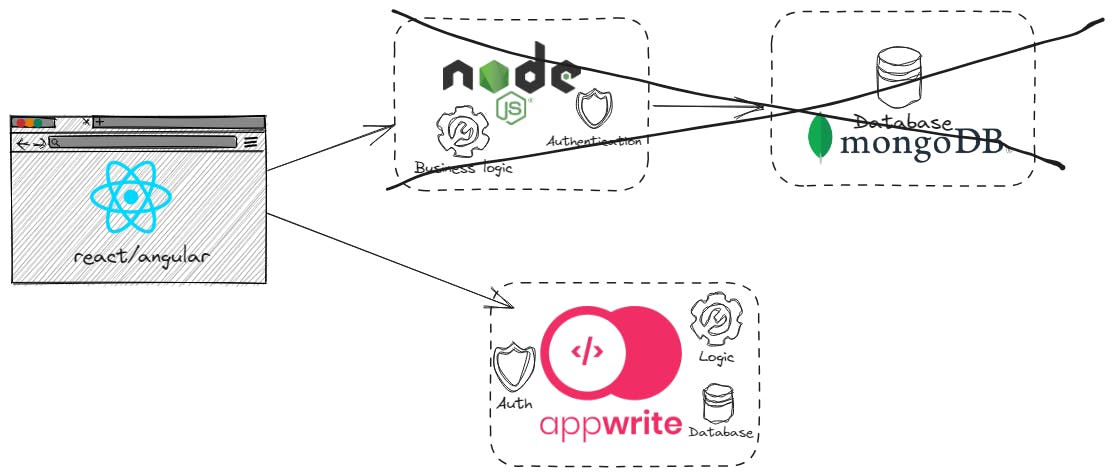
Appwrite offers a comprehensive and easy-to-use platform that simplifies web app development by eliminating the need for Node.js by providing a built-in server that handles HTTP requests and routes. offering a simple and easy-to-use database interface. It allows developers to store and retrieve data without the need for a separate database setup, reducing complexity and speeding up the development process.
Okay, Still didn't get it?
Let's dive deeper.......
for example, will try to insert student data into the database using node, express, and Mongo DB
StudentSchema.js: Describes the model of the student object
//StudentSchema.js
const mongoose = require('mongoose');

const StudentSchema = new mongoose.Schema({
    StudentId: Number,
    Name: String,
    Roll: Number,
    Birthday: Date,
    Address: String
});

module.exports = mongoose.model(
    'student', StudentSchema, 'Students');
api.js When you make a request to localhost:3000/api, express will search for api route and execute the api.js file.
const mongoose = require('mongoose');
const express = require('express');
const router = express.Router();
const StudentModel = require('./studentschema');

// Connecting to database
const query = 'mongodb+srv://Username:<password>'
    + '@student.tuufn.mongodb.net/College?'
    + 'retryWrites=true&w=majority'

const db = (query);
mongoose.Promise = global.Promise;

mongoose.connect(db, {
    useNewUrlParser: true,
    useUnifiedTopology: true
}, function (error) {
    if (error) {
        console.log("Error!" + error);
    }
});

module.exports = router;
Once this is done, we will use .save() to save it to the database.
router.get('/save', function (req, res) {
    const newStudent = new StudentModel({
        StudentId: 101,
        Name: "Sam", Roll: 1, Birthday: 2001 - 09 - 08
    });

    newStudent.save(function (err, data) {
        if (err) {
            console.log(error);
        }
        else {
            res.send("Data inserted");
        }
    });
});
Here's the standard backend code that your application should include. The process of creating StudentSchema.js, Api.js, and a controller to execute the insertion operation may be time-consuming, which could delay the release of your application.
What if I told you instead of implementing all those files? You just need to implement a single controller like this...
const appwrite = new Appwrite();

appwrite
 .setEndpoint('YOUR_API_ENDPOINT')
 .setProject('YOUR_PROJECT_ID');

// Authenticate if required

const studentData = {
 name: 'John Doe',
 age: 20,
 grade: 'A',
};

appwrite
 .createDocument('your_collection_id', studentData)
 .then((response) => {
   console.log('Student data inserted successfully:', response);
 })
 .catch((error) => {
   console.error('Error inserting student data:', error);
 });
The above code showcases the magical capabilities of Appwrite ✨. It highlights how Appwrite's prebuilt features can simplify the application development process significantly.
Summary
We explored how Appwrite can simplify web app development by eliminating the need for Node.js, MongoDB, and complex business logic. With its pre-built services and powerful features, Appwrite allows developers to focus on building the front end and delivering robust web applications faster than ever before.
The comprehensive set of instructions on how to utilize Appwrite to implement a single function to insert a record in the database. Moreover, Provided a brief comparison between traditional backend and backend-as-a-service (BaaS) approaches. The steps covered creating the essential files, defining the schema for student data, and writing the code to call the API endpoints and interact with the database.
In the Next blog, I'll show you how to build a simple full stack App using Appwrite
Stay tuned for part 2...✌
Thank you for reading it ...❤❤